
If you want to test your apps developed on Xcode with your own jailbroken iPhone, you have to change some settings in Xcode. This guide will tell you everything you need to set up.
First of all I have to say that I was using my iPhone 4 wit iOS 5.0.1 and Xcode version 4.6. If you have other versions or another device this guide should still work, but I can’t guarantee anything. Every step is reversible so if you break anything up, just do this guide backwards or leave a comment.
1) Jailbreak your iDevice
You need a jailbroken iDevice to test your apps on it. If you haven’t done so, jailbreak your device with any guide out there. Just google for your iDevice and iOS version with the word jailbreak.
2) Install AppSync
If you have your iPhone jailbroken, go to Cydia and add the http://cydia.hackulo.us repository to your sources. Then search for AppSync iOS 5.0+ or similar, depending on your iDevice iOS version.

3) Create a certificate
In the Keychain app on your Mac, create a self-signed certificate with the name „iPhone Developer“. You do this by clicking on Keychain Access in the status bar, then Certificate Assistant -> Create a Certificate…
In the following windows insert or select and leave everything alse empty or unchecked:
- Name: iPhone Developer
- Identity Type: Self Signed Root
- Certificate Type: Code Signing
- Check „Let me override defaults“
Continue:
- Serial Number: 1
- Validity Period: 3650
Continue:
- Name (Common Name): iPhone Developer
Continue:
- Key Size: 2048 bits
- Algorithm: RSA
Continue:
- Check „Include Key Usage Extension“
- Check „This extension is critical“
- Check „Signature“
Continue:
- Check „Include Extended Key Usage Extension“
- Check „This extension is critical“
- Check „Email Protection“
- Check „Code Signing“
Continue:
- Uncheck „Include Basic Constraints Extension
Continue:
- Check „Include Subject Alternate Name Extension“
Continue:
- Keychain: login
Then just hit „Create“ and after a lot of checking, unchecking and inserting you should have created your certificate successfully.
4) Modify plist files in Xcode
Change the following lines in the appropriate files:
/Applications/Xcode.app/Contents/Developer/Platforms/iPhoneOS.platform/Developer/SDKs/iPhoneOS5.1.sdk/SDKSettings.plist
<key>CODE_SIGNING_REQUIRED</key>
<string>YES</string>
Change to:
<key>CODE_SIGNING_REQUIRED</key>
<string>NO</string>
AND
<key>ENTITLEMENTS_REQUIRED</key>
<string>YES</string>
Change to:
<key>ENTITLEMENTS_REQUIRED</key>
<string>NO</string>
/Applications/Xcode.app/Contents/Developer/Platforms/iPhoneOS.platform/Info.plist
This line appears two times, so make sure you modify both!
<key>CODE_SIGN_CONTEXT_CLASS</key>
<string>XCiPhoneOSCodeSignContext</string>
Change to:
<key>CODE_SIGN_CONTEXT_CLASS</key>
<string>XCCodeSignContext</string>
5) Configure Xcode
The next steps will use the Mac terminal. If your new to the terminal make sure you do the exact same steps as described (you can break alot with the terminal).
Run the following commands within the terminal:
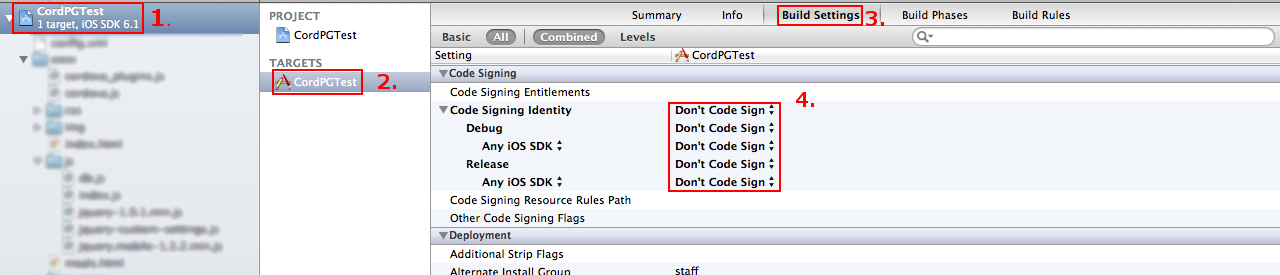
cd /Applications/Xcode.app/Contents/Developer/Platforms/iPhoneOS.platform/Developer/Library/Xcode/PrivatePlugIns/iPhoneOS\ Build\ System\ Support.xcplugin/Contents/MacOS/cp ./iPhoneOS\ Build\ System\ Support ./iPhoneOS\ Build\ System\ Support.saveprintf "\xc3\x26\x00\x00" >> ./iPhoneOS\ Build\ System\ Supportchmod a+x iPhoneOS\ Build\ System\ SupportAfter that configure Xcode to do not code sign like in the picture below:
6) Configure fake-code signing
Next you need to tweak some settings to make fake code-sign work. Insert the following in the terminal:
mkdir /Applications/Xcode.app/Contents/Developer/iphoneentitlements511cd /Applications/Xcode.app/Contents/Developer/iphoneentitlements511curl -O http://www.alexwhittemore.com/iphone/gen_entitlements.txtmv gen_entitlements.txt gen_entitlements.pychmod 777 gen_entitlements.py
7) Plug in the iPhone
Now you have to connect your jailbroken iPhone with your computer and open Xcode afterwards. Then open Window->Organizer in the menu, select your device on the left side and click on „Use for development“. If you get a prompt like „iPhone Provisioning Portal Login“, just cancel it.
7) Add a run-srcript to your project
Make sure you do the following steps for every new project you create!
In the menu go to Project > New Build Phase > New Run Script Build Phase. Then add the following lines:
export CODESIGN_ALLOCATE=/Developer/Platforms/iPhoneOS.platform/Developer/usr/bin/codesign_allocate
if [ "${PLATFORM_NAME}" == "iphoneos" ]; then
/Developer/iphoneentitlements401/gen_entitlements.py "my.company.${PROJECT_NAME}" "${BUILT_PRODUCTS_DIR}/${WRAPPER_NAME}/${PROJECT_NAME}.xcent";
codesign -f -s "iPhone Developer" --entitlements "${BUILT_PRODUCTS_DIR}/${WRAPPER_NAME}/${PROJECT_NAME}.xcent" "${BUILT_PRODUCTS_DIR}/${WRAPPER_NAME}/"
fi
Now you are ready to go! Select your jailbreak iPhone in the top-left dropdown and run your app!
Many credits and a big THANKS go to:
Alex Whittemore
Vishal Agarwal